We are happy to supply our Quick MC2 X19 AC gyro stabilizer for Hakan Lange’s 49ft DeFever trawler, berthed in Boat Lagoon Marina in Phuket, Thailand.
Hakan is the boss of Derani Yachts, a leading yacht brokerage and management firm – a recognized name – in the Phuket market. We hope to fit many more Quick gyro stabilizers on board his fleet 🤜🤛
Tl;dr: Watch this video below. For full installation details, please continue reading below.
Gyro stabilizer details
Brand: Quick SpA
Model: MC2 X19 AC
Key specs:
– For boats weighing up to 30T
– 18700Nm output torque
– Weight: 533kg (without optional base plate)
– Size: 60 × 60 × 66cm
– Power absorbed: 3.5kWmax
– AC input voltage: 220-240Vac
 Boat details:
Builder: DeFever Cruisers
Model: DeFever 49
Full load displacement: Approx. 24T
Length overall (LOA): 49ft, ≈15m
Hull construction: Fibreglass

Boat survey:
There is plenty of space in this boat’s engine room to accommodate our gyro stabilizer.


Now that we’ve assessed the space required to install our gyro stabilizer, the next step of course is to close the order😆
Here’s the most important installation step: fabricating a base plate that is to be mounted to the boat’s hull that will eventually be where the gyro will be mounted on.
As always, the base plate has to be in contact with the hull as much as possible so that the forces exerted by the gyro stabilizer is transferred to the hull structure, thereby stabilizing the boat.
Here below you’ll see the base plate sitting on a raised base and its sides mounted to the stringers of the boat before being laminated onto the hull structure.


Now that the most important step is done, next is to lower the gyro stabilizer into position and then bolt it down to the base plate.
![]()


Gyro stabilizer lowered into position nicely! Before and after photos below.


Final step is to bolt the gyro stabilizer down to the base plate. Completed installation photos below.


Since our Quick gyro stabilizers are air-cooled, it’s important to have ventilation – inlet and outlet ventilator fan or blower. Alternatively, aircon will work too. Since this boat has a big engine room, it naturally has an inlet & outet ventilator fan, which is sufficient for our gyro stabilizer.


The next step is to wire up the gyro stabilizer’s AC dynamic control driver and the touch screen control panel display.


The driver should be mounted as close to the gyro stabilizer as much as possible as there are many cables running between them. The driver unit also has a cooling fan and will generate some noise so mounting it in the engine room would be ideal.
As for our touch screen control panel display, it’s usually recessed into the helm’s dashboard together with the other switches & controls but since this boat has a lot of space at the helm area, owner decided to surface mount it right in front of the dashboard.

The touch screen control panel display need not be installed near the helm station area as you’ll only need to tap the “on” button on the panel once and after that, the gyro stabilizer will spool up and stabilize your boat automatically. The display panel is more for monitoring the gyro stabilizer’s parameters rather controlling the gyro unit.
With the installation done immaculately, it’s time to bring the boat out for a sea trial! Here are the amazing results of the sea trial:

Our 97% roll reduction is a pretty unbelievable result, so for some context, we recorded it the boat’s roll within 2x 5-minute windows – 1 with the gyro turned on and the other with the gyro turned off. The app then plots the 2 charts against each other to calculate the roll reduction for that period and that’s what we got!
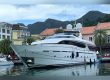
Ending of this post with another photo of this beautiful DeFever 49. Feel free to contact us for more information!